I've been trying to understand replication so based on a question on the UDK forums I decided to implement a flash light whose on/off state can be replicated.
First, create a subclass of a SpotLightMovable which will act as the flash light.
class MyFlashLight extends SpotLightMovable
notplaceable;
defaultproperties
{
Begin Object name=SpotLightComponent0
LightColor=(R=255,G=0,B=0)
End Object
bNoDelete=FALSE
}
Next, we will modify our custom pawn by adding the flashlight as a variable.
var MyFlashLight FlashLight;
We also need a variable that we will replicate the flashlight's on/off state.
var repnotify bool bIsFlashlightOn; /// whether the flashlight is on or not
Then in the pawn's PostBeginPlay, we will attach the flash light to the pawn.
simulated function PostBeginPlay()
{
FlashLight = Spawn(class'MyFlashLight', self);
FlashLight.SetBase(self);
FlashLight.LightComponent.SetEnabled(self.default.bIsFlashlightOn);
super.PostBeginPlay();
}
And set the variable's default value in the pawn's default properties.
defaultproperties
{
...
bIsFlashlightOn=true
}
Now we need a way to switch the flashlight on and off. We will set this up via an exec function that will be called when the "R" key is pressed. I added my key bind to the DefaultInput.ini (You might need to make the file writable as its read-only by default).
Add this line at the end of the section marked as Primary default bindings
.Bindings=(Name="R",Command="ToggleFlashlight")
This says that when the R key is pressed the exec function ToggleFlashlight will be called. We will define the function in our cutsom PlayerController subclass.
exec function ToggleFlashlight()
{
MyPawn(Pawn).ToggleFlashlight();
}
This calls the PlayerController's Pawn's ToggleFlashlight function (a mouth-full I know). Now this is where the magic happens. Since we essentially have all the information we need to determine whether the flash light can be turned on or not (without consulting the server) we can do what is nessecary to switch on the flashlight. To do this, we need to mark the funtion with the simulated keyword.
simulated function ToggleFlashlight()
{
bIsFlashlightOn = !bIsFlashlightOn;
FlashLightToggled();
// if we are a remote client, make sure the Server toggles the flashlight
if( Role < Role_Authority )
{
ServerToggleFlashlight();
}
}
We start by changing the value of our variable that keeps track of the flashlight's state.
Next we check whether we are a client - in which case we need to tell the server what we have done by calling a server function. The server function essentially does the same thing as the client version, but on the server.
reliable server function ServerToggleFlashlight()
{
bIsFlashlightOn = !bIsFlashlightOn;
`log("ServerToggleFlashlight: " $ bIsFlashlightOn);
FlashLightToggled();
}
You'll notice that both functions call the FlashLightToggled function. This does the actual state switch.
simulated function FlashLightToggled()
{
if(bIsFlashlightOn)
{
FlashLight.LightComponent.SetEnabled(true);
}
else
{
FlashLight.LightComponent.SetEnabled(false);
}
}
This has taken care of the client that switched the flashlight on/off and the server, but what about the other clients. If you look at the definition of the bIsFlashlightOn variable, its defined as repnotify. What this does is whenever the variable changes, a special function ReplicatedEvent is called.
simulated event ReplicatedEvent(name VarName)
{
if (VarName == 'bIsFlashlightOn')
{
FlashLightToggled();
}
else
{
Super.ReplicatedEvent(VarName);
}
}
This function will be called on all the clients including the client that initiated the whole thing.
We also need a way to tell the server when to send the variable to its clients, this is done through a replication condition in our pawn class like this.
replication
{
// replicated properties
if ( bNetDirty )
bIsFlashlightOn;
}
That about covers it. Here are the full sources for each of the 3 classes we have touched on.
MyFlashlight.uc
class MFlashLight extends SpotLightMovable
notplaceable;
defaultproperties
{
Begin Object name=SpotLightComponent0
LightColor=(R=255,G=0,B=0) /// red so we can see the change
End Object
bNoDelete=FALSE
}
MyPawn.uc
class MyPawn extends UTPawn
config(Game)
notplaceable;
var MyFlashLight FlashLight;
var repnotify bool bIsFlashlightOn; /// whether the flashlight is on or not
replication
{
// replicated properties
if ( bNetDirty )
bIsFlashlightOn;
}
simulated function PostBeginPlay()
{
FlashLight = Spawn(class'KDFlashLight', self);
FlashLight.SetBase(self);
FlashLight.LightComponent.SetEnabled(self.default.bIsFlashlightOn);
super.PostBeginPlay();
}
/**
* Check on various replicated data and act accordingly.
*/
simulated event ReplicatedEvent(name VarName)
{
`log(VarName @ "replicated");
if (VarName == 'bIsFlashlightOn')
{
FlashLightToggled();
`log("bIsFlashlightOn replicated");
}
else
{
Super.ReplicatedEvent(VarName);
}
}
simulated function ToggleFlashlight()
{
bIsFlashlightOn = !bIsFlashlightOn;
`log("ToggleFlashlight: " $ bIsFlashlightOn);
FlashLightToggled();
// if we are a remote client, make sure the Server Set's toggles the flashlight
`log("Role:" @ Role);
if( Role < Role_Authority )
{
ServerToggleFlashlight();
}
}
reliable server function ServerToggleFlashlight()
{
bIsFlashlightOn = !bIsFlashlightOn;
`log("ServerToggleFlashlight: " $ bIsFlashlightOn);
FlashLightToggled(!bIsFlashlightOn);
}
simulated function FlashLightToggled()
{
if(bIsFlashlightOn)
{
FlashLight.LightComponent.SetEnabled(true);
}
else
{
FlashLight.LightComponent.SetEnabled(false);
}
}
defaultproperties
{
bIsFlashlightOn=true
}
MyPlayerController.uc
class MyPlayerController extends UTPlayerController;
exec function ToggleFlashlight()
{
MyPawn(Pawn).ToggleFlashlight();
}
state Dead
{
function EndState(name NextStateName)
{
SetBehindView(default.bBehindView);
}
}
defaultproperties
{
bBehindView = true
}
Tuesday, March 2, 2010

Tuesday, February 9, 2010
Walk your Pawn
So UTPawn, which many UDK users are subclassing does not walk, it only runs - has some place to be I guess. This short tutorial will show you how to make your Pawn walk.
When the PlayerController is calculating its movement, it calls its HandleWalking function to check if the Pawn wants to walk. In its definition, you will notice a check against a variable bRun.
function HandleWalking()
{
if ( Pawn != None )
Pawn.SetWalking( bRun != 0 );
}
bRun is an input variable whose value is set when you hold down the Left Shift key. A search for bRun in your UTInput.ini will give you this.
Bindings=(Name="Walking",Command="Button bRun")
and a search for walking will give you this.
Bindings=(Name="LeftShift",Command="Walking")
If (bRun != 0) i.e. Pawn wants to walk, the Pawn's SetWalking funtion is called. Looking at this function's definition in UTPawn, you will notice that its blank and doesnt do anything. Assuming you have a subclass of UTPawn as your game's default pawn, you need to override the SetWalking function. You should end up with something similar to this.
class Mypawn extends UTPawn;
event SetWalking( bool bNewIsWalking )
{
super(Pawn).SetWalking(bNewIsWalking);
}
defaultproperties
{
}
Super refers to our parent class which in this case is UTPawn but by adding Pawn in parenthesis, we're actually calling the the SetWalking function in the Pawn class and not in UTPawn.
If you try this out, you will notice that what we have done is just make the character move slower but he still looks like he is running. To fix this, we have to play around with the AnimTree so fire up the editor. What we want to do is use a different animation when the pawn is walking. Walking reduces the pawn's speed/velocity.
Assuming you are using the default Anim Tree, add an UTAnimBlendBySpeed node like in the image below.
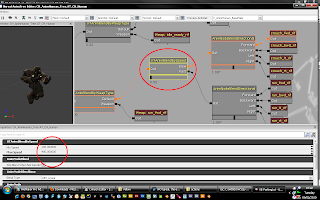
You will notice that I've set the minimum speed to 220 and the maximum speed to 440. By default, the UTPawn's maximum speed is 440 (GroundSpeed=440.0 in UTPawn.uc default properties) and its walking speed is half of this - so 220 (WalkingPct=+0.5 in Pawn.uc). So basically when the pawn is at full speed, the fast branch of the anim node is used entirelyand when walking the slow branch is used and when in the middle, the animations are blended together.
Thats it, enjoy walking.
When the PlayerController is calculating its movement, it calls its HandleWalking function to check if the Pawn wants to walk. In its definition, you will notice a check against a variable bRun.
function HandleWalking()
{
if ( Pawn != None )
Pawn.SetWalking( bRun != 0 );
}
bRun is an input variable whose value is set when you hold down the Left Shift key. A search for bRun in your UTInput.ini will give you this.
Bindings=(Name="Walking",Command="Button bRun")
and a search for walking will give you this.
Bindings=(Name="LeftShift",Command="Walking")
If (bRun != 0) i.e. Pawn wants to walk, the Pawn's SetWalking funtion is called. Looking at this function's definition in UTPawn, you will notice that its blank and doesnt do anything. Assuming you have a subclass of UTPawn as your game's default pawn, you need to override the SetWalking function. You should end up with something similar to this.
class Mypawn extends UTPawn;
event SetWalking( bool bNewIsWalking )
{
super(Pawn).SetWalking(bNewIsWalking);
}
defaultproperties
{
}
Super refers to our parent class which in this case is UTPawn but by adding Pawn in parenthesis, we're actually calling the the SetWalking function in the Pawn class and not in UTPawn.
If you try this out, you will notice that what we have done is just make the character move slower but he still looks like he is running. To fix this, we have to play around with the AnimTree so fire up the editor. What we want to do is use a different animation when the pawn is walking. Walking reduces the pawn's speed/velocity.
Assuming you are using the default Anim Tree, add an UTAnimBlendBySpeed node like in the image below.

You will notice that I've set the minimum speed to 220 and the maximum speed to 440. By default, the UTPawn's maximum speed is 440 (GroundSpeed=440.0 in UTPawn.uc default properties) and its walking speed is half of this - so 220 (WalkingPct=+0.5 in Pawn.uc). So basically when the pawn is at full speed, the fast branch of the anim node is used entirelyand when walking the slow branch is used and when in the middle, the animations are blended together.
Thats it, enjoy walking.
Friday, December 18, 2009
Scripting a simple Game in UDK
Let’s call our new game SGGame – with SG standing for standing for Simple Game. Prefix your game as you please.
First create a directory in your \Development\Src\ and give it the same name i.e. SGGame. In it, create a directory called Classes.
Next, let’s create a file in the Classes directory and call it SGGame.uc. Open the file in your favorite text editor and type in the code below.
class SGGame extends UTGame
config(Game);
defaultproperties
{
}
This basically defines a class called SGGame that extends the UTGame class. Generally, your game will extend a subclass of the GameInfo class. By extending the UTGame (also a subclass of GameInfo) class we gain a lot of functionality that we would require for an FPS game.
Now let’s compile our game just to make sure everything is fine so far. To do this, we want to run the UDK executable with a special command line argument – make. To make this easier as we will be using it a lot, we will make a shortcut on the desktop for this.
Go into the \Binaries\Win32 directory and copy the UDK.exe file. Right click on your desktop and click on Paste Shortcut. Rename the shortcut to Compile UDK Scripts. Right click on the shortcut and go to its properties. In the target section, add make.
Mine looks like this - X:\UDK-2009-12\Binaries\Win32\UDK.exe make
Running this right now will not compile your new game’s scripts because UDK does not yet know about our new game. To do this, we need to modify one of the .ini files. Go to \UTGame\Config and open DefaultEngine.ini in your text editor.
NOTE: By default, the file is read only; you need to make it writable from its properties to make these changes.
Scroll down to the [UnrealEd.EditorEngine] section and add the following line.
+EditPackages=SGGame
The UnrealEd.EditorEnginesection is used by the compiler to determine which packages exist and need to be compiled when they change.
The + (plus) basically tells the engine to add the line in the generated UTEngine.ini file.
NOTE: Whenever you make a change to the DefaultEngine.ini the engine will generate a new UTEngine.ini file on the next run. More information on this can be found in the Configuration File section of UDN.
Double click on the compiler shortcut to compile our game’s scripts. If there are any syntax errors in the file, you will get the warnings/errors in the compilation window. It should however compile without any problems.
It’s time to see what we’ve done so far. We will load up the examplemap map for this. We’ll use another shortcut and command line argument to run the map with our game. Copy and paste a UDK shortcut like we did before. Call this Simple Game(or whatever else your prefer). Open its properties and add ExampleMap?Game=SGGame.SGGame
This basically tells UDK to load the map called ExampleMap and run the game called SGGame in the SGGame package.
There you go; you have a basic game up and running.
First create a directory in your \Development\Src\ and give it the same name i.e. SGGame. In it, create a directory called Classes.
Next, let’s create a file in the Classes directory and call it SGGame.uc. Open the file in your favorite text editor and type in the code below.
class SGGame extends UTGame
config(Game);
defaultproperties
{
}
This basically defines a class called SGGame that extends the UTGame class. Generally, your game will extend a subclass of the GameInfo class. By extending the UTGame (also a subclass of GameInfo) class we gain a lot of functionality that we would require for an FPS game.
Now let’s compile our game just to make sure everything is fine so far. To do this, we want to run the UDK executable with a special command line argument – make. To make this easier as we will be using it a lot, we will make a shortcut on the desktop for this.
Go into the \Binaries\Win32 directory and copy the UDK.exe file. Right click on your desktop and click on Paste Shortcut. Rename the shortcut to Compile UDK Scripts. Right click on the shortcut and go to its properties. In the target section, add make.
Mine looks like this - X:\UDK-2009-12\Binaries\Win32\UDK.exe make
Running this right now will not compile your new game’s scripts because UDK does not yet know about our new game. To do this, we need to modify one of the .ini files. Go to \UTGame\Config and open DefaultEngine.ini in your text editor.
NOTE: By default, the file is read only; you need to make it writable from its properties to make these changes.
Scroll down to the [UnrealEd.EditorEngine] section and add the following line.
+EditPackages=SGGame
The UnrealEd.EditorEnginesection is used by the compiler to determine which packages exist and need to be compiled when they change.
The + (plus) basically tells the engine to add the line in the generated UTEngine.ini file.
NOTE: Whenever you make a change to the DefaultEngine.ini the engine will generate a new UTEngine.ini file on the next run. More information on this can be found in the Configuration File section of UDN.
Double click on the compiler shortcut to compile our game’s scripts. If there are any syntax errors in the file, you will get the warnings/errors in the compilation window. It should however compile without any problems.
It’s time to see what we’ve done so far. We will load up the examplemap map for this. We’ll use another shortcut and command line argument to run the map with our game. Copy and paste a UDK shortcut like we did before. Call this Simple Game(or whatever else your prefer). Open its properties and add ExampleMap?Game=SGGame.SGGame
This basically tells UDK to load the map called ExampleMap and run the game called SGGame in the SGGame package.
There you go; you have a basic game up and running.
The UDK bandwagon
If you are a game development enthusiast/hobbyist/indie like me, you've probably heard of UDK. If not, get out from under that rock and head staright to http://www.udk.com. It's pretty much an Indies dream come true.
I've been using it since early November and its a hell of a steep learning curve but at the end of the day, its Unreal. I've joined a small indie team as an Unreal Scripter to work on a project called Nothern Island 1983.
The feature list is very impressive, including speed tree, face fx, the unreal editor in all its glory, documentation via the UDN and recently released video tutorials. Christmas really did come early this year and the Indie(read me) has to stop making excuses.
I've been using it since early November and its a hell of a steep learning curve but at the end of the day, its Unreal. I've joined a small indie team as an Unreal Scripter to work on a project called Nothern Island 1983.
The feature list is very impressive, including speed tree, face fx, the unreal editor in all its glory, documentation via the UDN and recently released video tutorials. Christmas really did come early this year and the Indie(read me) has to stop making excuses.
Tuesday, April 8, 2008
Brute Terrain texture splatting
After getting texture splatting working I'm seriously re-thinking implementing my "Brute force chunk NO-LOD terrain." I was in such a rush to do it that I didn't really think about it.
Using nebula's fixed function render path, I need a pass for each detail texture plus an additional pass for the base texture and the performance is not too bad with 3 detail textures and a base texture. Since I was developing using the fixed function render path, it didn't occur to me that on shader model 2.0 hardware, I only need 1 pass to blend all my detail textures (4 so far) plus my base texture. Since the whole idea was to improve the look of distant geometry it really doesn't make sense anymore (see below). Plus I can use a single image to store alpha maps for 4 detail textures in each of its 4 channels.
About my splatting implementation; Initially, I wanted to blend the base texture based on the camera's distance from the particular point being rendered. As a first step to that, I tried a fixed blend value of 0.5 which looked really good. I then used the camera's distance method and distant geometry didn't look as good as with a fixed value. So I decided to go with the fixed value version.
See for yourself


I'm pretty happy with the results but any criticism/comments are welcome
Using nebula's fixed function render path, I need a pass for each detail texture plus an additional pass for the base texture and the performance is not too bad with 3 detail textures and a base texture. Since I was developing using the fixed function render path, it didn't occur to me that on shader model 2.0 hardware, I only need 1 pass to blend all my detail textures (4 so far) plus my base texture. Since the whole idea was to improve the look of distant geometry it really doesn't make sense anymore (see below). Plus I can use a single image to store alpha maps for 4 detail textures in each of its 4 channels.
About my splatting implementation; Initially, I wanted to blend the base texture based on the camera's distance from the particular point being rendered. As a first step to that, I tried a fixed blend value of 0.5 which looked really good. I then used the camera's distance method and distant geometry didn't look as good as with a fixed value. So I decided to go with the fixed value version.
See for yourself


I'm pretty happy with the results but any criticism/comments are welcome
Monday, March 31, 2008
Brute force chunk NO-LOD terrain
I’m still not sure whether this is a good idea but here is the idea. I managed to get texture splatting working on the brute force terrain. I’m testing it using a laptop that defaults to nebula’s fixed function render path. Using the fixed function, I have to do a pass for each detail texture. I’ve set the shader to use 4 details textures so 4 passes. I’m still getting a decent frame rate of about 60 but as always a new problem rears its ugly head.
Distant primitives look very obviously tiled. So I had a bright idea (I think). I want to split the terrain mesh into chunks. I believe the beauty of brute terrains is that the entire terrain is uploaded once into the graphics hardware, now I want to split the beauty of it?

With Splatting

Without Splatting
The whole point of chunking it is so that distant chunks will be rendered using the large diffuse texture and a single pass. Chunks closer to the current view will be rendered using a splatting shader and a number of detail textures. I’m not trying to gain any speed improvements but rather to get rid of the tiling in distant geometry. I’m thinking I should get a trade of by gaining some speed for reducing the number of passes in distant geometry and loosing some speed for sending more batches of geometry so I’m hoping for pretty much the same frame rate as I’m getting now with splatting.
Wish me luck.
Brute … not so bad
I started working on my terrain implementation for nebula over the weekend. I chose to do a brute force implementation first just to get the hang of concepts like generating vertices from height map values and generating texture coordinates.
When I initially developed an interest in making games, I never thought I would have to do a terrain, I remember skipping the terrain chapter in a DirectX book I was reading back then. Needless to say I went back to said chapter over the weekend.
I now have a brute force terrain renderer which uses nebula’s default standard shader with a diffuse texture stretched over the terrain. You can imagine that the texture up close is anything but pretty.
Here is how it works. The terrain object requires an input heightmap with 8 bits per pixel. You may also provide a tile size parameter which is used to determine the number of vertices required plus to control the resolution of the terrain. A higher tile size means less vertices and a less smooth terrain.
Say we provide a heightmap of 1024 x 1024 pixels, a terrain of 1024 x 1024 units will be generated. If we had set the tile size to 32, we will end up with a vertex every 32 pixels/units. Therefore we will end up with 33 x 33 vertices for a 1024 x 1024 unit terrain which is pretty decent but what I’m most impressed about is the frame rate. I’m getting a frame rate of about 120 on a laptop with an intel chip though its still needs work on the texturing.


My plan was to get a basic brute force implementation rendering then immediately move on to a chunk lod implementation. Right now, I’m actually thinking I can get away with brute force so I’m looking at whether I can add texture splatting to it and see how far I can get with it.
A question for anyone who can provide some insight on using triangle strip primitives. According to the direct sdk docs, every 2nd triangles should be oriented reversed for it to work properly. I can’t get the terrain to render properly using triangle strips. Looking at the bottom of the terrain, I see holes on every 2nd triangles and from the top it seems fine but I can see hanging meshes on some parts of the terrain.
Subscribe to:
Posts (Atom)